4runner 4th Gen Install Daystar 2115 Easy Guide

Wireless Charging Station For Apple + Andriod Devices Setup + Step-By-Step Install For the 5th Gen 4Runner
Have you ever taken a trip or gone to work only to realize you forgot to grab your charging cord?
Maybe you just hate having cable clutter in your 4Runner. Well, if you're one of those people, then this easy modification is for you.
Today we'll be covering how to add a wireless charger to your T4R using some simple tools and accessories. Some of the benefits of having this would include not having to worry about forgetting your charger and being able to charge a variety of devices (must be able to charge through induction).
There aren't necessarily any negatives to adding a wireless charger since it will not be visible and would always be there when you need it. And it can all be done in a single afternoon, with simple hand tools and under $50.
Compatible Smart Devices For Wireless Charging
- Apple/iOS: iPhone 11/ XR/ X/ 8 + AirPods with wireless charging case
- Google/Andriod: Pixel 4 + Pixel 3
- Any other device that fits inside the little cubby section with wireless charging
Required Parts + Tools You'll Need For Setup
- Wireless Charging Transmitter Module (3 Coil Model): Check Price
- Meknic Car Dash Cam Hardwire Kit: Check Price
- Phillips #2 Screwdriver
- Double-Sided Tape
- Zip Ties
Optional Items For Install:
- Plastic Trim Removal Tools
Step 1. Remove Side Trim + AC Controls

The side pieces should be easy to remove.
Simply pry them off using a bit of pressure, or you could use the trim removal tools. You can pull straight out on the sides of the dash panels using the palms of your hands and tips of your fingers to remove the 4Runners dash.
Once they have been removed, you can simply remove the AC controls by pulling from the sides with slight pressure. Exercise caution and do not pull too hard, as it will have a single connector on the back.
Once removed, release the connector and set it to the side.
Step 2. Remove Center Console Shift Section

As shown in the picture above, carefully remove the center console.
Start by removing the shift knob and cup holders section first, then move on to remove the small filler piece towards the front of the center console.
Step 2A. Shift + Cup Holders Section Removed
For the second step, the section with the shifter and cup holders has to be removed.
If you have an SR5 model, you can get away with only having to rotate it 90 degrees. Manual transfer case models have to be fully removed.
Begin by removing the shift knobs by turning them counter-clockwise, then lifting them off.
Step 2B. Remove Filler Piece On Center Console

Once you have the cupholder section moved out of the way, there is a small filler piece right in front that you have to remove by pulling back and up.
Step 2C. Remove Head Unit + Power Outlet Tray
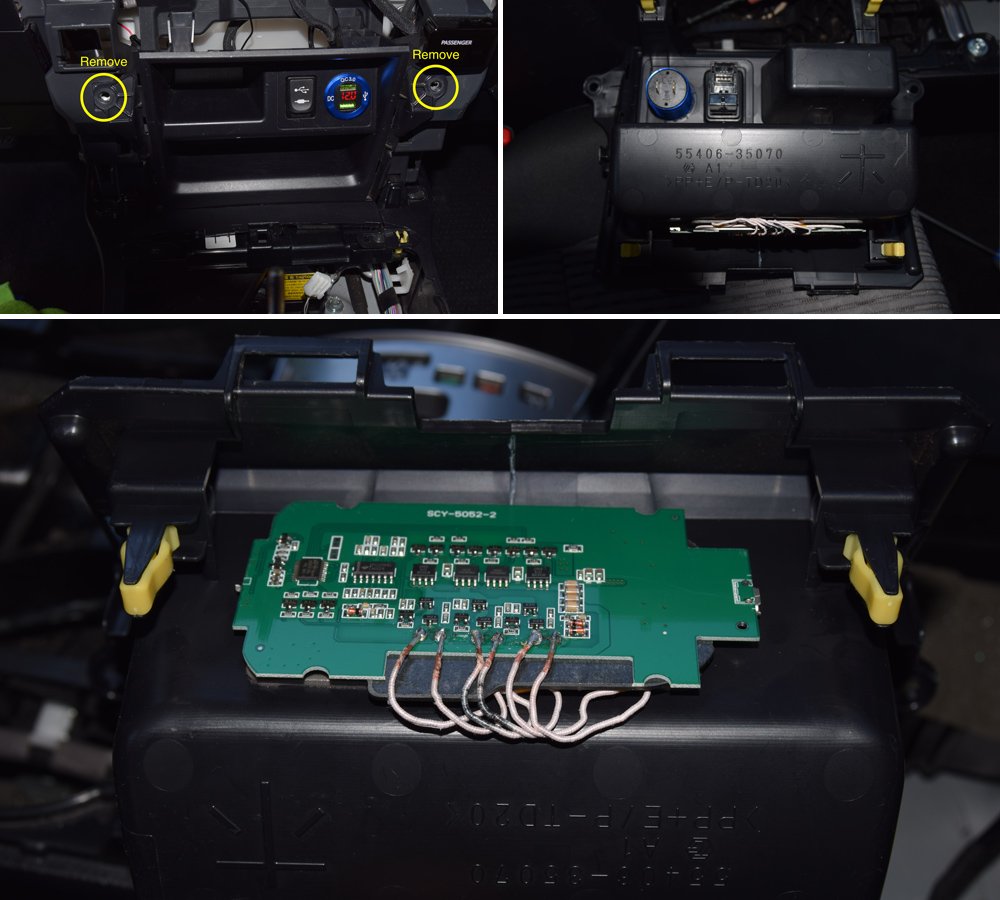
Now that the filler piece has been removed, it's time to remove the two screws holding the head unit connectors and power outlet tray in place. Once removed, simply pull on the sides to release it.
Once it is free, disconnect the AUX/USB connector for the head unit, and the connector for the power outlet. Then you can proceed to fit the induction coil to the bottom side of the tray.
Double-sided tape is a great way to adhere it to the underside.
Ensure the coils are facing towards the plastic side, while also leaving about half an inch on the side where the micro-USB plug will connect to the coils.
Step 3. Set-Up & Route Wiring

Now that the induction coil has been attached, it is time to tackle the wiring side of the project.
You will need to find a keyed switch ignition circuit if you want it to be on when the car is on, and off when its off. If you prefer to keep it constantly on, then you have to find a constant on a circuit or wire it directly to the battery.
In this case, it will be a keyed switch ignition.
Step 3A. Access Fuse Panel Under Driver's Side Dash
You will want to access the fuse panel under the dash on the driver's side, shown in the image above.
You will need a micro fuse circuit tap. If you purchase the wiring kit in the link above, it has you covered. Also, with the fuse tap, the fuse cover and index will not be able to go back on; so it will have to be kept somewhere you can access it later on.
Step 3B. Route Newly Circuited Fuse Tap To Center Dash

Now that it has been added to the circuit, it must now be routed to the center of the dash.
It is a straight shot; you can use zip ties to secure the wiring to the existing wires under the dash and feed it through the opening in the middle of the dash.
You can also add a zip tie to secure all of the excess cables.
Step 3C. Connect Ground To Bare Metal Surface On Unit

Once it is routed; you will have to connect your ground to any bare, unpainted metal surface that attaches to the body or a grounding point.
Then you simply connect the micro-USB plug to the induction coils, then pop the tray back into the dash.
At this point, the wireless charger can be tested to verify that everything works. Simply turn your key to the ignition "on" position, and check to see if it starts charging your device.
Step 4. Reinstall AC Controls + Trim

Once you've verified that it works properly, everything can now be put back together.
Step 4A. Reinstall Filler Plate Onto Center Console
Begin by putting the filler plate on the bottom back in place. Then reconnect the connectors on the bottom of the shifter and cupholder piece. Then it can be snapped back into place as well.
Shift knobs can then be screwed back on. Once they start getting snug, simply position them back into the correct orientation.
Step 4B. Reinstall Head Unit + Power Outlet Tray

Next, the two screws that were removed can be reinstalled.
Note: Be careful not to over-torque them (they're going into plastic, which runs the risk of cracking if over-torqued).
Step 4C. Reinstall AC Controls

Next the AC controls can be installed.
Simply reconnect the single connector on the back, and then align the four clips in the back and press it into place.
Step 4D. Reinstall + Replace All Cover Panels + Screws

The last step to putting everything back together would be popping the side cover panels back on. Simply make sure the back corners are sliding in between the dash in the back.
Almost done!
Finally, to help keep your devices from sliding around, you can also get a small piece of rubber matting, and trim it to fit. Then simply use some adhesive to adhere it to the piece to keep your device in place.
Final Thoughts
In summary, this is a great addition to any 4Runner.
Not only can it be done using basic tools, but it's also great to have when you are in a pinch without a charging cord. It's such a cool hidden feature to show off and hear people ask how you did it.
Source: https://trail4runner.com/2020/01/17/wireless-charger-install-5th-gen-4runner/
0 Response to "4runner 4th Gen Install Daystar 2115 Easy Guide"
Post a Comment